组员重构代码千奇百怪,直接JS、ES6和Vue规范给一梭子

近期组员接手了一个“古老“的初始由后端大佬写的前端项目,业务层面的组件复用,全靠是 copy 相同代码咱不说,经过不同大佬们的维护,代码风格更是千奇百怪。该前端项目还在正常迭代更新,又不可能重写,面对 💩 一样的代码,两个接手的小前端抱着欲哭无泪,瑟瑟发抖。见状,只能安慰之,暂时发挥啊 Q 精神,规范自己的新代码,然后每次迭代开发任务重构一两个旧组件,此过程持续 2-3 个月后,上 eslint 和 prettier 自动化检测语法和格式化代码。
本着“代码不规范,新人两行泪”的警示,总结出如下 JavaScrip、ES6 和 Vue 单文件组件相关代码风格案例,供大家参考。

开发流程规范

这里可能有小伙伴有疑问了,开发流程规范不是项目经理定的吗 🤔️,跟我有什么关系?

这里想告诉大家的是,开发流程在一定程度上应该是由我们自己来掌控。不管是传统开发的模式还是敏捷开发的模式,对于开发者来说核心依旧是高质高效的完成用户提出的需求。

不少开发者在拿到产品经理的需求后就开始急匆匆的写代码,以此来体现他们的高效,但往往却因为需求理解不到位和前期代码欠缺设计导致 bug 率高和返工。

如何找到适合自己的开发流程是需要依靠经验来支撑的,需要反复总结和思考,最终达到高质高效完成的目的。

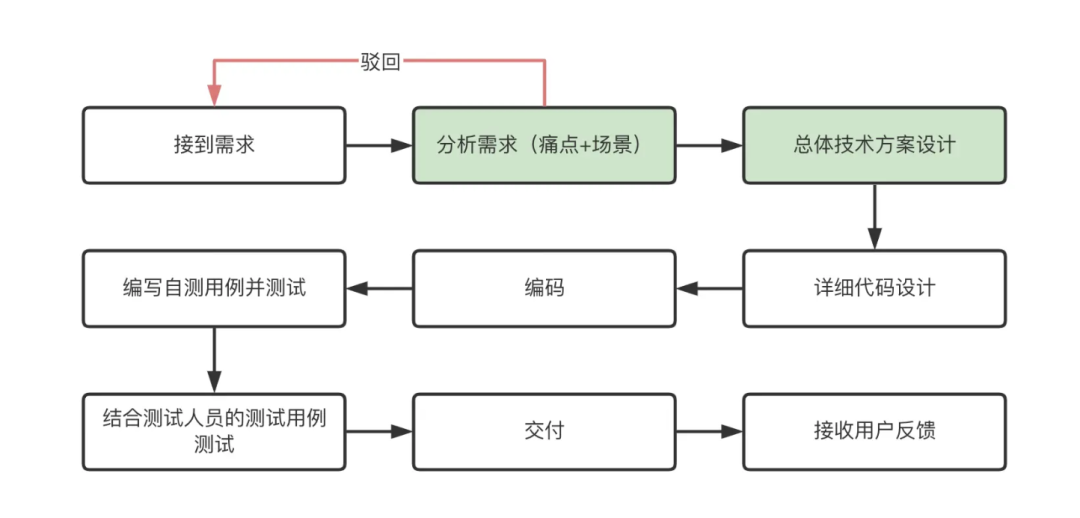
在接收到需求后应第一时间去了解这个需求的背景是什么?这么做到底有没有解决用户的痛点?或者说用户更深层次的需求是什么?如果团队的产品经理经验不丰富,往往可以在这个阶段砍掉很多不合理的需求(这一点真的很重要)。

对于复杂大功能往往还需要进行技术方案调研和技术方案设计,并输出详细的设计文档。涉及到细节上,则需要将数据流走向、组件设计等通过脑图的形式呈现出来。

代码格式化规范

由于每个开发者的 IDE 不同,即使 IDE 相同也会因为每个人的配置不一样导致格式化的结果不一样。如何确保团队内开发人员采用统一的格式化配置呢?

这里给推荐大家使用 prettier,它内置了一套格式化的规则,具体配置:

1、安装依赖

1
2
3
npm install --save-dev --save-exact prettier
// or
yarn add --dev --exact prettie

2、创建一个空配置文件,让编辑器和其他工具知道你正在使用 Prettier

1
echo {}> .prettierrc.json

3、创建一个.prettierignore 文件,让 Prettier CLI 和编辑器知道哪些文件不能格式化

1
2
3
4
# Ignore artifacts:
dist
build
coverag

4、配置编辑器(VScode 为例)

IDE 中安装 Prettier-Code Formater 插件

找到 IDE 中设置模块,搜索 format On Save,勾上这个就可以了。

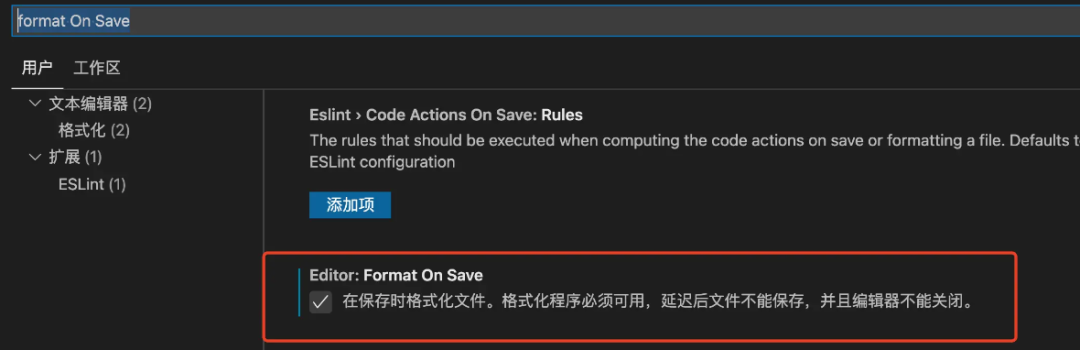
现在当我们 Ctrl + S 保存代码时,插件就会帮助我们自动格式化了。

这里有小伙伴要问了,要是有人将没有格式化的代码提交上去怎么办?

这时候就需要在 git commit 的阶段自动将提交的代码进行格式化,这里我们借助工具 husky,它主要可以帮助我们在 git 阶段检查提交消息、运行测试、检查代码等。没接触过的小伙伴可以去官网了解一下,配置如下:

1、安装 husky 和 lint-staged

1
2
3
4
5
6
7
8
9
npm install --save-dev husky lint-staged
npx husky install
npm set-script prepare "husky install"
npx husky add .husky/pre-commit "npx lint-staged"
// or
yarn add --dev husky lint-staged
npx husky install
npm set-script prepare "husky install"
npx husky add .husky/pre-commit "npx lint-staged

2、然后将以下内容添加到 package.json 中

1
2
3
4
5
{
"lint-staged": {
"**/*": "prettier --write --ignore-unknown"
}
}

这段配置的意思是:当执行 git commit 阶段前,先执行 lint-staged,lint-staged 中的内容就是对暂存区的文件执行格式化的命令。
其他:若使用的是脚手架工具搭建的项目,会自带 eslint 配置(eslintConfig)。prettier 和 eslint 会有一些配置上的冲突,这个时候需要安装 eslint-config-prettier 以使 ESLint 和 Prettier 相互配合,安装完后在.eslintrc 中配置(以 Create-React-App 为例)

1
2
3
4
5
6
7
"eslintConfig": {
"extends": [
"react-app",
"react-app/jest",
"prettier"
]
}

这样就可以用”prettier”的部分规则覆盖前面的规则,让它们都能正常工作。

JS/TS 代码规范插件

JS/TS 主流的大致有这几种:

Airbnb JavaScript Style Guide
Google JavaScript Style Guide
Idiomatic JavaScript Style Guide
JavaScript Standard Style Guide
jQuery JavaScript Style Guide

比较推荐使用 Airbnb JavaScript Style Guide,它在 Github 上足有 12 万 star,几乎覆盖了 JavaScript 的每一项特性。

具体配置:

1、安装依赖

1
2
3
npm install eslint --save-dev
// or
yarn add eslint --de

2、生成配置文件

1
2
3
npm init @eslint/config
// or
yarn create @eslint/confi

跟着终端中的提示,按照自身需求一步步选择即可。

有了具体的规范后,我们同样需要使用工具去约束:还是通过在 git commit 阶段校验,若不通过则取消提交。

配置(还是在 package.json 中的 lint-staged ):

1
2
3
4
"lint-staged": {
"**/*": "prettier --write --ignore-unknown", //格式化
"src/*": "eslint --ext .js,.ts,.tsx" //进行eslint校验
}

注意:这里如果选用的 Typescript,则会默认使用@typescript-eslint/parser 解析器,官方为了追求更快的解析速度,并不会对.ts 文件中的类型进行检查,只会做语法检测。
如果需要对类型也进行检测,需要在 extends 中加上 plugin:@typescript-eslint/recommended-requiring-type-checking。
索性这里换了另一种方式:在 pre commit 中执行 yarn run tsc,这里的意思是对项目中 ts 文件进行类型检测,默认会读取根目录中的 tsconfig.json 配置。
这种方式并不完美,它的弊端就在于全量检测,如果项目不大还好,若是项目代码量够多,检测 10-20s 也是常有的事。

CSS 代码规范插件

CSS 检查代码规范使用 stylelint 插件,规范则推荐使用 stylelint-config-standard

1、安装

1
npm install --save-dev stylelint stylelint-config-standar

2、在项目的根目录中创建一个配置文件.stylelintrc.json,内容如下

1
2
3
{
"extends": "stylelint-config-standard"
}

3、解决与 prettier 配置的冲突

1
npm install --save-dev stylelint-config-prettier

4、将下面配置复制到.stylelintrc.json 中

1
2
3
{
"extends": ["stylelint-config-standard", "stylelint-config-prettier"]
}

5、在 git commitv 阶段进行检测

1
2
3
4
5
"lint-staged": {
"**/*": "prettier --write --ignore-unknown", //格式化
"src/**.{js,jsx,ts,tsx}": "eslint --ext .js,.jsx,.ts,.tsx", //对js文件检测
"**/*.{less,css}": "stylelint --fix" //对css文件进行检测
},

Git commit 规范

git commit 规范主要可以帮助开发人员在 code review 期间更容易理解提交的内容,现在大部分主流 commit 规范都是基于Angular 团队的规范而衍生出来的,它的 message 格式如下:

1
2
3
4
5
<type>(<scope>): <subject>
<BLANK LINE>
<body>
<BLANK LINE>
<footer

每个提交消息都包含一个 subject、一个 body 和一个 footer (中间使用空行分割),提交信息的任何一行不能超过 100 个字符。

👉 type 主要有以下几种类型:

  • feat: 一个新特性
  • fix: 修复 bug
  • docs: 文档修改
  • style: 不影响代码含义的更改(空格、格式、缺少分号等)
  • refactor: 代码重构
  • perf: 优化性能
  • test: 测试用例修改
  • chore: 对构建过程或辅助工具和库的更改,例如文档生成

👉 scope:可以是影响范围的任何内容。

👉 subject:包含对更改的简洁描述,规则:

  • 使用陈述语句
  • 第一个字母不要大写
  • 末尾没有点 (.)

👉 body:commit 具体修改内容, 可以分为多行,应该包括改变的动机,并与以前的行为进行对比。

👉 footer: 一些备注, 通常是修复的 bug 的链接。

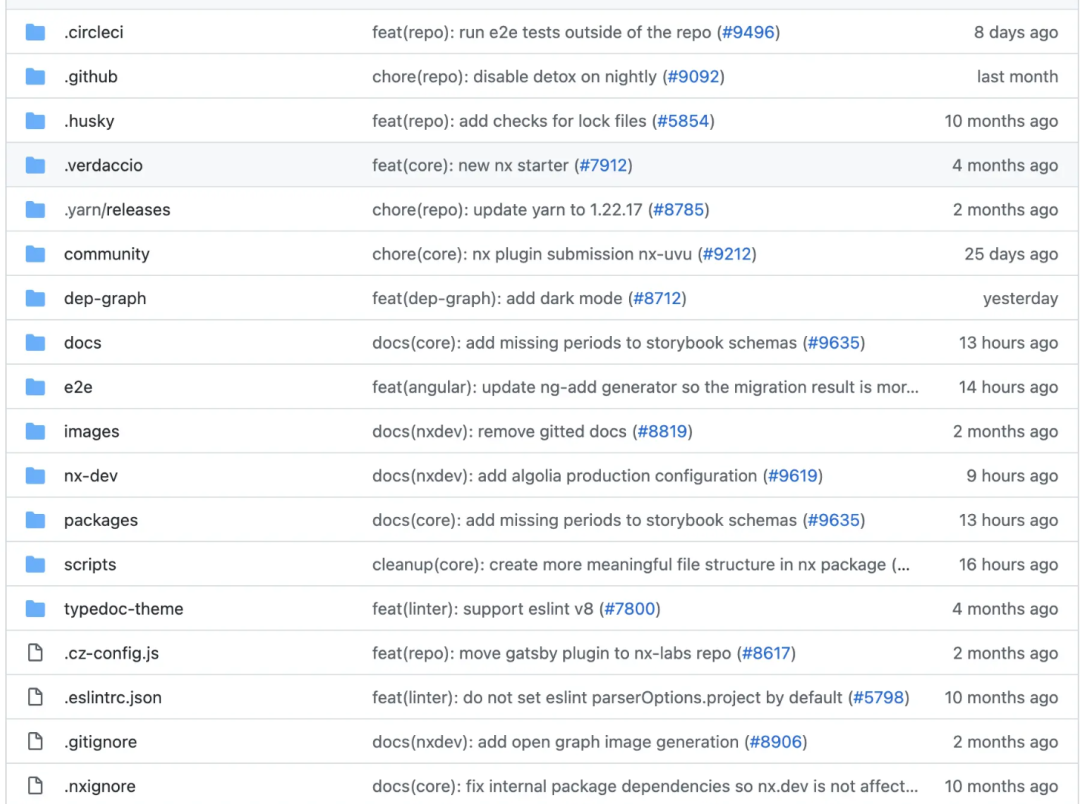
截取一张开源库的 commit,example:

有了规范后,我们需要通过工具去约束:commitlint。它要做的就是在我们每次提交 git commit 的时候,都会帮我们检查 commit message 是否符合一定的规范,如果不符合,就让这次提交失败。

具体配置:

1
2
3
4
5
6
7
8
9
10
11
12
# 安装 commitlint cli 和 conventional config
npm install --save-dev @commitlint/{config-conventional,cli}
# Windows:
npm install --save-dev @commitlint/config-conventional @commitlint/cli

# 配置要使用的 commitlint 规则
echo "module.exports = {extends: ['@commitlint/config-conventional']}" > commitlint.config.js

# 加入到husky中:
npx husky add .husky/commit-msg 'npx --no -- commitlint --edit "$1"'
or
yarn husky add .husky/commit-msg 'yarn commitlint --edit $1

Javascript 代码风格

使用有意义的变量名称

变量的名称应该是可描述,有意义的, JavaScript 变量都应该采用驼峰式大小写 ( camelCase) 命名。

1
2
3
4
5
6
7
8
9
10
11
// bad ❌
const foo = 'JDoe@example.com'
const bar = 'John'
const age = 23
const qux = true

// good ✅
const email = 'John@example.com'
const firstName = 'John'
const age = 23
const isActive = true

布尔变量通常需要回答特定问题,例如:

1
2
3
isActive
didSubscribe
hasLinkedAccount

避免添加不必要的上下文

当对象或类已经包含了上下文的命名时,不要再向变量名称添加冗余的上下文。

1
2
3
4
5
6
7
8
9
10
11
12
13
14
15
16
17
18
19
20
21
// bad ❌
const user = {
userId: '296e2589-7b33-400a-b762-007b730c8e6d',
userEmail: 'JDoe@example.com',
userFirstName: 'John',
userLastName: 'Doe',
userAge: 23
}

user.userId

//good ✅
const user = {
id: '296e2589-7b33-400a-b762-007b730c8e6d',
email: 'JDoe@example.com',
firstName: 'John',
lastName: 'Doe',
age: 23
}

user.id

避免硬编码值

1
2
3
4
5
6
7
// bad ❌
setTimeout(clearSessionData, 900000)

//good ✅
const SESSION_DURATION_MS = 15 * 60 * 1000

setTimeout(clearSessionData, SESSION_DURATION_MS)

使用有意义的函数名称

函数名称需要描述函数的实际作用,即使很长也没关系。函数名称通常使用动词,但返回布尔值的函数可能是个例外 — 它可以采用 是或否 问题的形式,函数名也应该是驼峰式的。

1
2
3
4
5
6
7
8
9
10
11
12
13
14
15
16
17
// bad ❌
function toggle() {
// ...
}

function agreed(user) {
// ...
}

//good ✅
function toggleThemeSwitcher() {
// ...
}

function didAgreeToAllTerms(user) {
// ...
}

限制参数的数量

尽管这条规则可能有争议,但函数最好是有 3 个以下参数。如果参数较多可能是以下两种情况之一:

  • 该函数做的事情太多,应该拆分。
  • 传递给函数的数据以某种方式相关,可以作为专用数据结构传递。
1
2
3
4
5
6
7
8
9
10
11
12
13
14
15
16
17
18
19
20
21
// bad ❌
function sendPushNotification(title, message, image, isSilent, delayMs) {
// ...
}

sendPushNotification('New Message', '...', 'http://...', false, 1000)

//good ✅
function sendPushNotification({ title, message, image, isSilent, delayMs }) {
// ...
}

const notificationConfig = {
title: 'New Message',
message: '...',
image: 'http://...',
isSilent: false,
delayMs: 1000
}

sendPushNotification(notificationConfig)

避免在一个函数中做太多事情

一个函数应该一次做一件事,这有助于减少函数的大小和复杂性,使测试、调试和重构更容易。

1
2
3
4
5
6
7
8
9
10
11
12
13
14
15
16
17
18
19
// bad ❌
function pingUsers(users) {
users.forEach((user) => {
const userRecord = database.lookup(user)
if (!userRecord.isActive()) {
ping(user)
}
})
}

//good ✅
function pingInactiveUsers(users) {
users.filter(!isUserActive).forEach(ping)
}

function isUserActive(user) {
const userRecord = database.lookup(user)
return userRecord.isActive()
}

避免使用布尔标志作为参数

函数含有布尔标志的参数意味这个函数是可以被简化的。

1
2
3
4
5
6
7
8
9
10
11
12
13
14
15
16
17
// bad ❌
function createFile(name, isPublic) {
if (isPublic) {
fs.create(`./public/${name}`)
} else {
fs.create(name)
}
}

//good ✅
function createFile(name) {
fs.create(name)
}

function createPublicFile(name) {
createFile(`./public/${name}`)
}

避免写重复的代码

如果你写了重复的代码,每次有逻辑改变,你都需要改动多个位置。

1
2
3
4
5
6
7
8
9
10
11
12
13
14
15
16
17
18
19
20
21
22
23
24
25
26
27
28
29
30
31
32
33
34
35
36
37
38
39
40
41
42
43
44
// bad ❌
function renderCarsList(cars) {
cars.forEach((car) => {
const price = car.getPrice()
const make = car.getMake()
const brand = car.getBrand()
const nbOfDoors = car.getNbOfDoors()

render({ price, make, brand, nbOfDoors })
})
}

function renderMotorcyclesList(motorcycles) {
motorcycles.forEach((motorcycle) => {
const price = motorcycle.getPrice()
const make = motorcycle.getMake()
const brand = motorcycle.getBrand()
const seatHeight = motorcycle.getSeatHeight()

render({ price, make, brand, nbOfDoors })
})
}

//good ✅
function renderVehiclesList(vehicles) {
vehicles.forEach((vehicle) => {
const price = vehicle.getPrice()
const make = vehicle.getMake()
const brand = vehicle.getBrand()

const data = { price, make, brand }

switch (vehicle.type) {
case 'car':
data.nbOfDoors = vehicle.getNbOfDoors()
break
case 'motorcycle':
data.seatHeight = vehicle.getSeatHeight()
break
}

render(data)
})
}

避免副作用

JavaScript 中,你应该更喜欢函数式模式而不是命令式模式。换句话说,大多数情况下我们都应该保持函数纯洁。副作用可能会修改共享状态和资源,从而导致一些奇怪的问题。所有的副作用都应该集中管理,例如你需要更改全局变量或修改文件,可以专门写一个 util 来做这件事。

1
2
3
4
5
6
7
8
9
10
11
12
13
14
15
16
17
18
19
20
21
22
23
// bad ❌
let date = '21-8-2021'

function splitIntoDayMonthYear() {
date = date.split('-')
}

splitIntoDayMonthYear()

// Another function could be expecting date as a string
console.log(date) // ['21', '8', '2021'];

//good ✅
function splitIntoDayMonthYear(date) {
return date.split('-')
}

const date = '21-8-2021'
const newDate = splitIntoDayMonthYear(date)

// Original vlaue is intact
console.log(date) // '21-8-2021';
console.log(newDate) // ['21', '8', '2021'];

另外,如果你将一个可变值传递给函数,你应该直接克隆一个新值返回,而不是直接改变该它。

1
2
3
4
5
6
7
8
9
// bad ❌
function enrollStudentInCourse(course, student) {
course.push({ student, enrollmentDate: Date.now() })
}

//good ✅
function enrollStudentInCourse(course, student) {
return [...course, { student, enrollmentDate: Date.now() }]
}

使用非负条件

1
2
3
4
5
6
7
8
9
10
11
12
13
14
15
16
17
// bad ❌
function isUserNotVerified(user) {
// ...
}

if (!isUserNotVerified(user)) {
// ...
}

//good ✅
function isUserVerified(user) {
// ...
}

if (isUserVerified(user)) {
// ...
}

尽可能使用简写

1
2
3
4
5
6
7
8
9
10
11
12
13
14
15
16
17
18
19
20
21
// bad ❌
if (isActive === true) {
// ...
}

if (firstName !== '' && firstName !== null && firstName !== undefined) {
// ...
}

const isUserEligible = user.isVerified() && user.didSubscribe() ? true : false

//good ✅
if (isActive) {
// ...
}

if (!!firstName) {
// ...
}

const isUserEligible = user.isVerified() && user.didSubscribe()

避免过多分支

尽早 return 会使你的代码线性化、更具可读性且不那么复杂。

1
2
3
4
5
6
7
8
9
10
11
12
13
14
15
16
17
18
19
20
21
22
23
24
25
// bad ❌
function addUserService(db, user) {
if (!db) {
if (!db.isConnected()) {
if (!user) {
return db.insert('users', user)
} else {
throw new Error('No user')
}
} else {
throw new Error('No database connection')
}
} else {
throw new Error('No database')
}
}

//good ✅
function addUserService(db, user) {
if (!db) throw new Error('No database')
if (!db.isConnected()) throw new Error('No database connection')
if (!user) throw new Error('No user')

return db.insert('users', user)
}

优先使用 map 而不是 switch 语句

既能减少复杂度又能提升性能。

1
2
3
4
5
6
7
8
9
10
11
12
13
14
15
16
17
18
19
20
21
22
23
24
// bad ❌
const getColorByStatus = (status) => {
switch (status) {
case 'success':
return 'green'
case 'failure':
return 'red'
case 'warning':
return 'yellow'
case 'loading':
default:
return 'blue'
}
}

//good ✅
const statusColors = {
success: 'green',
failure: 'red',
warning: 'yellow',
loading: 'blue'
}

const getColorByStatus = (status) => statusColors[status] || 'blue'

使用可选链接

1
2
3
4
5
6
7
8
9
10
11
12
13
14
15
16
17
18
19
20
21
const user = {
email: 'JDoe@example.com',
billing: {
iban: '...',
swift: '...',
address: {
street: 'Some Street Name',
state: 'CA'
}
}
}

// bad ❌
const email = (user && user.email) || 'N/A'
const street = (user && user.billing && user.billing.address && user.billing.address.street) || 'N/A'
const state = (user && user.billing && user.billing.address && user.billing.address.state) || 'N/A'

//good ✅
const email = user?.email ?? 'N/A'
const street = user?.billing?.address?.street ?? 'N/A'
const street = user?.billing?.address?.state ?? 'N/A'

避免回调

回调很混乱,会导致代码嵌套过深,使用 Promise 替代回调。

1
2
3
4
5
6
7
8
9
10
11
12
13
14
15
16
17
18
19
20
21
22
23
24
25
26
27
28
29
30
31
32
33
34
// bad ❌
getUser(function (err, user) {
getProfile(user, function (err, profile) {
getAccount(profile, function (err, account) {
getReports(account, function (err, reports) {
sendStatistics(reports, function (err) {
console.error(err)
})
})
})
})
})

//good ✅
getUser()
.then(getProfile)
.then(getAccount)
.then(getReports)
.then(sendStatistics)
.catch((err) => console.error(err))

// or using Async/Await ✅✅

async function sendUserStatistics() {
try {
const user = await getUser()
const profile = await getProfile(user)
const account = await getAccount(profile)
const reports = await getReports(account)
return sendStatistics(reports)
} catch (e) {
console.error(err)
}
}

处理抛出的错误和 reject 的 promise

1
2
3
4
5
6
7
8
9
10
11
12
13
14
15
16
17
18
19
20
21
22
23
24
// bad ❌
try {
// Possible erronous code
} catch (e) {
console.log(e)
}

//good ✅
try {
// Possible erronous code
} catch (e) {
// Follow the most applicable (or all):
// 1- More suitable than console.log
console.error(e)

// 2- Notify user if applicable
alertUserOfError(e)

// 3- Report to server
reportErrorToServer(e)

// 4- Use a custom error handler
throw new CustomError(e)
}

只注释业务逻辑

1
2
3
4
5
6
7
8
9
10
11
12
13
14
15
16
17
18
19
20
21
22
23
24
25
26
27
28
29
30
31
32
33
34
35
36
37
38
39
40
41
// bad ❌
function generateHash(str) {
// Hash variable
let hash = 0

// Get the length of the string
let length = str.length

// If the string is empty return
if (!length) {
return hash
}

// Loop through every character in the string
for (let i = 0; i < length; i++) {
// Get character code.
const char = str.charCodeAt(i)

// Make the hash
hash = (hash << 5) - hash + char

// Convert to 32-bit integer
hash &= hash
}
}

// good ✅
function generateHash(str) {
let hash = 0
let length = str.length
if (!length) {
return hash
}

for (let i = 0; i < length; i++) {
const char = str.charCodeAt(i)
hash = (hash << 5) - hash + char
hash = hash & hash // Convert to 32bit integer
}
return hash
}

ES6 优化原生 JS(ES5) 代码风格

使用默认参数

1
2
3
4
5
6
7
8
9
10
// bad ❌
function printAllFilesInDirectory(dir) {
const directory = dir || './'
// ...
}

// good ✅
function printAllFilesInDirectory(dir = './') {
// ...
}

对象结构取值

1
2
3
4
5
6
7
8
9
10
11
12
13
14
15
16
const obj = {
a: 1,
b: 2,
c: 3,
d: 4,
e: 5
}

// bad ❌
const f = obj.a + obj.d
const g = obj.c + obj.e

// good ✅
const { a, b, c, d, e } = obj
const f = a + d
const g = c + e

ES6 的解构赋值虽然好用。但是要注意解构的对象不能为 undefinednull。否则会报错,故要给被解构的对象一个默认值。

1
const { a, b, c, d, e } = obj || {}

拓展运算符合并数据

合并数组或者对象,用 ES5 的写法有些冗余

1
2
3
4
5
6
7
8
9
10
11
12
13
14
15
16
const a = [1, 2, 3]
const b = [1, 5, 6]
const obj1 = {
a: 1
}
const obj2 = {
b: 1
}

// bad ❌
const c = a.concat(b) //[1,2,3,1,5,6]
const obj = Object.assign({}, obj1, obj2) // {a:1, b:1}

// good ✅
const c = [...new Set([...a, ...b])] //[1,2,3,5,6]
const obj = { ...obj1, ...obj2 } // {a:1, b:1}

拼接字符

1
2
3
4
5
6
7
8
9
10
11
12
13
const name = '小明'
const score = 59

// bad ❌
let result = ''
if (score > 60) {
result = `${name}的考试成绩及格`
} else {
result = `${name}的考试成绩不及格`
}

// good ✅
const result = `${name}${score > 60 ? '的考试成绩及格' : '的考试成绩不及格'}`

includes 替代多条件判断

1
2
3
4
5
6
7
8
9
10
11
12
13
14
15
16
// bad ❌
f(
type == 1 ||
type == 2 ||
type == 3 ||
type == 4 ||
){
//...
}

// good ✅
const condition = [1,2,3,4];

if( condition.includes(type) ){
//...
}

列表查找某一项

1
2
3
4
5
6
7
8
9
10
11
const a = [1, 2, 3, 4, 5]

// bad ❌
const result = a.filter((item) => {
return item === 3
})

// good ✅
const result = a.find((item) => {
return item === 3
})

数组扁平化

1
2
3
4
5
6
7
8
9
10
11
12
13
14
15
16
17
18
// bad ❌
const deps = {
采购部: [1, 2, 3],
人事部: [5, 8, 12],
行政部: [5, 14, 79],
运输部: [3, 64, 105]
}
let member = []
for (let item in deps) {
const value = deps[item]
if (Array.isArray(value)) {
member = [...member, ...value]
}
}
member = [...new Set(member)]

// good ✅
const member = Object.values(deps).flat(Infinity)

可选链操作符获取对象属性值

1
2
3
4
5
// bad ❌
const name = obj && obj.name

// good ✅
const name = obj?.name

动态对象属性名

1
2
3
4
5
6
7
8
// bad ❌
let obj = {}
let index = 1
let key = `topic${index}`
obj[key] = '话题内容'

// good ✅
obj[`topic${index}`] = '话题内容'

判断非空

1
2
3
4
5
6
7
8
9
// bad ❌
if (value !== null && value !== undefined && value !== '') {
//...
}

// good ✅
if ((value ?? '') !== '') {
//...
}

Vue 组件风格

Vue 单文件组件风格指南内容节选自 Vue 官方风格指南

组件数据

组件的 data 必须是一个函数。

1
2
3
4
5
6
7
8
9
10
11
12
13
14
15
// bad ❌
export default {
data: {
foo: 'bar'
}
};

// good ✅
export default {
data() {
return {
foo: 'bar'
};
}
};

单文件组件文件名称

单文件组件的文件名应该要么始终是单词大写开头 (PascalCase),要么始终是横线连接 (kebab-case)。

1
2
3
4
5
6
7
// bad ❌
mycomponent.vue
myComponent.vue

// good ✅
my - component.vue
MyComponent.vue

紧密耦合的组件名

和父组件紧密耦合的子组件应该以父组件名作为前缀命名。

1
2
3
4
5
6
7
8
9
10
11
// bad ❌
components/
|- TodoList.vue
|- TodoItem.vue
└─ TodoButton.vue

// good ✅
components/
|- TodoList.vue
|- TodoListItem.vue
└─ TodoListItemButton.vue

自闭合组件

在单文件组件中没有内容的组件应该是自闭合的。

1
2
3
4
5
<!-- bad -->
<my-component></my-component>

<!-- good -->
<my-component />

Prop 名大小写

在声明 prop 的时候,其命名应该始终使用 camelCase,而在模板中应该始终使用 kebab-case。

1
2
3
4
5
6
7
8
9
10
11
12
13
// bad ❌
export default {
props: {
'greeting-text': String
}
};

// good ✅
export default {
props: {
greetingText: String
}
};
1
2
3
4
5
<!-- bad -->
<welcome-message greetingText="hi" />

<!-- good -->
<welcome-message greeting-text="hi" />

指令缩写

指令缩写,用 : 表示 v-bind: ,用 @ 表示 v-on:

1
2
3
4
5
<!-- bad -->
<input v-bind:value="value" v-on:input="onInput" />

<!-- good -->
<input :value="value" @input="onInput" />

Props 顺序

标签的 Props 应该有统一的顺序,依次为指令、属性和事件。

1
2
3
4
5
6
7
8
9
10
<my-component
v-if="if"
v-show="show"
v-model="value"
ref="ref"
:key="key"
:text="text"
@input="onInput"
@change="onChange"
/>

组件选项的顺序

组件选项应该有统一的顺序。

1
2
3
4
5
6
7
8
9
10
11
12
13
14
15
16
17
18
19
20
21
22
23
24
25
export default {
name: '',

components: {},

props: {},

emits: [],

setup() {},

data() {},

computed: {},

watch: {},

created() {},

mounted() {},

unmounted() {},

methods: {}
}

组件选项中的空行

组件选项较多时,建议在属性之间添加空行。

1
2
3
4
5
6
7
8
9
10
11
12
13
14
15
16
17
18
19
20
21
export default {
computed: {
formattedValue() {
// ...
},

styles() {
// ...
}
},

methods: {
onInput() {
// ...
},

onChange() {
// ...
}
}
}

单文件组件顶级标签的顺序

单文件组件应该总是让顶级标签的顺序保持一致,且标签之间留有空行。

1
2
3
4
5
6
7
8
9
<template> ... </template>

<script>
/* ... */
</script>

<style>
/* ... */
</style>